Setting up Android :
| Summary | In this codelab, you'll learn how to set up Android Studio and get started to build applications. |
|---|---|
| URL | https://github.com/code-crusher/Android-Codelab |
| Category | Beginners Guide |
| Feedback Link | You can provide feedback on the content bundle and codelab here. |
Content
- Overview
- What you will learn
- What you will need
- Installing Java
- Installing Android Studio
- Building First Application
- Allow the user to send a message
- Show the (existing and new) messages
- Enable login
- Wrap-up
- What we've covered
- Next Steps
- Learn More
Overview -
In this codelab you’ll set up Android Studio and build a basic application.
What you will learn -
- Setting up Java and Installing Android Studio.
- Building basic Android application.
What you will need -
- Java Development Kit current version 8u60.
- Android Studio version 2.0+.
- A test device or emulator with Android 4.0+ (preferred 5.0+).
- The device must have internet access to download SDK components.
Getting Started -
Installing Java -
In this step we will set up Java Environment.
1. Download JDK from this link (http://www.oracle.com/technetwork/java/javase/downloads/jdk8-downloads-2133151.html) or the latest version available
and install.
2. Open your C: drive > Program Files and search Java folder and open it.
3. Open folder (like jdk1.7.0_40) depending on your jdk version > bin folder.
4. Search for file Javac, right click > properties and copy file path(eg. C:\Program Files\Java\jdk1.7.0_40\bin).
5. Goto start My computer > right click > properties.
6. Click Advance system settings on the left bar.
7. Click Environment Variables > New button.
8. For the Variable name, type : Path.
9. For Variable value, paste the Javac location path you copied.
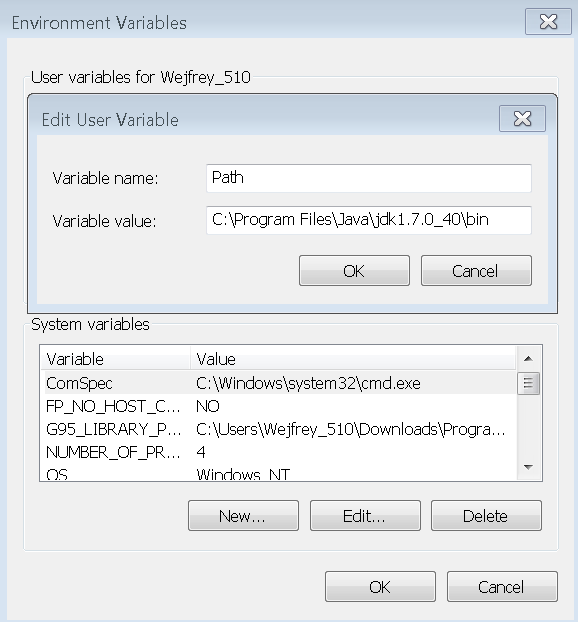
10. Click Ok and close all popups and close settings.
11. To check if it is setup, Open command promt and type javac, if you see java source files then you are all set to go!
Installing Android Studio -
In this step we will install Android Studio and setup SDK Manager.
1. You need to download Android Studio from this link(http://developer.android.com/sdk/index.html).
2. While installing the setup you can install the Android SDK updates at the time of installation or later manually.
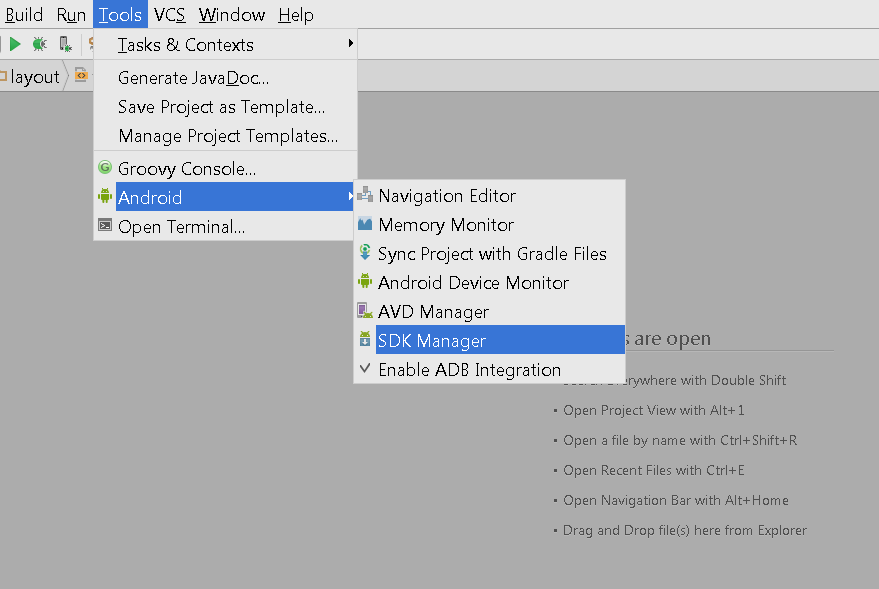
3. Open Android Studio > Tools > Android > Android SDK and open it.
4. Download and Install the latest updates(It will automatically select for you).
Building First Application -
1. Start Android Studio.
2. In the main window select Start a new Android Studio project.
3. Type the name of the app you want (Android Codelab GDG).
4. Change your Company Domain (You can't use default to upload apps to playstore).
5. Choose your project location.
6. Select next > next (we will use Blank Activity for now) > Finish.
7. Now to Run the app either choose Run 'app' from menu bar.
8. You will see this popup either Use a device( Follow this link to learn ) or Create AVD( Follow this link to learn ). Select the choice and press OK.
Adding Contacts with user input
Now we need to add contacs in the application.
To display contact image we will use ImageView.
To take input we will use EditText and TextInputLayouy.
- We’ll first add the necessary views to activity_main.xml:
 <RelativeLayout

            android:id="@+id/container"
            android:layout_width="wrap_content"
            android:layout_height="wrap_content"
            android:layout_below="@id/appbar"
            android:layout_margin="@dimen/activity_vertical_margin">

            <ImageView
                android:id="@+id/profile"
                android:layout_width="@dimen/photo_width"
                android:layout_height="@dimen/photo_height"
                android:layout_centerVertical="true"
                android:src="@drawable/photo" />

            <android.support.design.widget.TextInputLayout
                android:id="@+id/firstNameLayout"
                android:layout_width="match_parent"
                android:layout_height="wrap_content"
                android:layout_marginLeft="@dimen/activity_vertical_margin"
                android:layout_toRightOf="@+id/profile">

                <EditText
                    android:id="@+id/firstName"
                    android:layout_width="match_parent"
                    android:layout_height="wrap_content"
                    android:hint="@string/first_name" />
            </android.support.design.widget.TextInputLayout>

            <android.support.design.widget.TextInputLayout
                android:id="@+id/secondNameLayout"
                android:layout_width="match_parent"
                android:layout_height="wrap_content"
                android:layout_below="@+id/firstNameLayout"
                android:layout_marginLeft="@dimen/activity_vertical_margin"
                android:layout_toRightOf="@+id/profile">

                <EditText
                    android:id="@+id/surName"
                    android:layout_width="match_parent"
                    android:layout_height="wrap_content"
                    android:hint="@string/second_name" />
            </android.support.design.widget.TextInputLayout>

        </RelativeLayout>
Now we have to add EditText and TextInputLayout in our MainActivity.java
private TextInputLayout firstNameLayout, secondNameLayout;
private EditText firstName, surName;
and initialize them at the end of the onCreate method:
firstNameLayout = (TextInputLayout) findViewById(R.id.firstNameLayout);
secondNameLayout = (TextInputLayout) findViewById(R.id.secondNameLayout);
firstName = (EditText) findViewById(R.id.firstName);
surName = (EditText) findViewById(R.id.surName);
- Next, we’ll add a method that grabs the text from the input and saves it within our app :
 private void storeValues(View view) {
        if (firstName.getText().toString().trim().length() == 0) {
            firstNameLayout.setError("First Name is required*");
            return;
        } else if (surName.getText().toString().trim().length() == 0) {
            secondNameLayout.setError("Surname is required*");
            return;
        } else {
            SharedPreferences prefs = this.getSharedPreferences("stored", MODE_PRIVATE);
            SharedPreferences.Editor edit = prefs.edit();
            edit.putString("firstname", firstName.getText().toString());
            edit.putString("surname", surName.getText().toString());
            edit.apply();
            Snackbar.make(view, "Details Saved!", Snackbar.LENGTH_LONG)
                    .setAction("Clear", new View.OnClickListener() {
                        @Override
                        public void onClick(View v) {
                            clearValues();
                            setStoredValues();
                        }
                    }).show();
        }
    }
- Next, we’ll add a method that restores the saved values when reopened the app and also clears the data when user request :
private void setStoredValues() {
        SharedPreferences prefs = this.getSharedPreferences("stored", MODE_PRIVATE);
        firstName.setText(prefs.getString("firstname", ""));
        surName.setText(prefs.getString("surname", ""));
    }

    private void clearValues() {
        SharedPreferences prefs = this.getSharedPreferences("stored", MODE_PRIVATE);
        SharedPreferences.Editor edit = prefs.edit();
        edit.putString("firstname", "");
        edit.putString("surname", "");
        edit.putString("address", "");
        edit.apply();
    }
You will have to import the packages for some of these classes. Android Studio will tell you where to import them from.
-
Here we grab the message from the EditText as the user clicks on the fab and stores the values into app after performing the check that the input fields are non-empty.
-
Now we'll call the fab to trigger the process :
fab.setOnClickListener(new View.OnClickListener() {
            @Override
            public void onClick(View view) {
                storeValues(view);
            }
        });
-
If you now run the application in the emulator, you will see an input fields with a check mark fab button below.
-
Try inputting the values and store and restore those values. Also try saving with a blank field to see error message.
Adding Navigation Drawer
To make an applicaion more browsable with less user input we use Navigation Drawer. This facilitates the user to access different categories in same place.
To implement navigation view we need to setup few files :1) drawer_viewer.xml - which will be placed under res >menu. It will contain all the items to be displayed in the drawer. Now we can directly make menu items and add them into drawer we will make.
2) content_main.xml - which will contain the layout of drawer.
drawer_viewer.xml :
<menu xmlns:android="http://schemas.android.com/apk/res/android">

    <group android:checkableBehavior="single">
        <item
            android:id="@+id/nav_home"
            android:icon="@android:drawable/radiobutton_off_background"
            android:title="@string/home" />
        <item
            android:id="@+id/nav_category1"
            android:icon="@android:drawable/radiobutton_off_background"
            android:title="@string/category1" />
        <item
            android:id="@+id/nav_category2"
            android:icon="@android:drawable/radiobutton_off_background"
            android:title="@string/category2" />
    </group>


    <item android:title="@string/subItems">
        <menu>
            <item
                android:icon="@android:drawable/radiobutton_off_background"
                android:title="@string/Subitem" />
            <item
                android:icon="@android:drawable/radiobutton_off_background"
                android:title="@string/Subitem" />
            <item
                android:icon="@android:drawable/radiobutton_off_background"
                android:title="@string/Subitem" />
        </menu>
    </item>

</menu>
-
Each group contains different items and each menu contains differnt sub items.
content_main.xml : -
In the XMl we added Navigation View within Drawer View to display menu items.
<android.support.v4.widget.DrawerLayout xmlns:android="http://schemas.android.com/apk/res/android"
    xmlns:app="http://schemas.android.com/apk/res-auto"
    android:id="@+id/drawer_layout"
    android:layout_width="match_parent"
    android:layout_height="match_parent"
    android:fitsSystemWindows="true">

    <include layout="@layout/activity_main" />

    <android.support.design.widget.NavigationView
        android:id="@+id/nav_view"
        android:layout_width="wrap_content"
        android:layout_height="match_parent"
        android:layout_gravity="start"
        android:fitsSystemWindows="true"
        app:headerLayout="@layout/nav_header"
        app:menu="@menu/drawer_view" />


</android.support.v4.widget.DrawerLayout>
Now we will add the nav_header.xml file to display the header in the drawer
<LinearLayout xmlns:android="http://schemas.android.com/apk/res/android"
    android:layout_width="match_parent"
    android:layout_height="192dp"
    android:background="?attr/colorPrimaryDark"
    android:gravity="bottom"
    android:orientation="vertical"
    android:padding="16dp"
    android:theme="@style/ThemeOverlay.AppCompat.Dark">

    <TextView
        android:layout_width="match_parent"
        android:layout_height="wrap_content"
        android:text="@string/app_name"
        android:textAppearance="@style/TextAppearance.AppCompat.Body1" />

</LinearLayout>
- Now we need to implement navigation view in MainActivity.java :
Now we'll add DrawerLayout :
private DrawerLayout mDrawerLayout;
and initialize in the onCreate method:
mDrawerLayout = (DrawerLayout) findViewById(R.id.drawer_layout);
Now we'll make function to make click listener for the menu items in the drawer :
private void setupDrawerContent(NavigationView navigationView) {
              navigationView.setNavigationItemSelectedListener(
                      new NavigationView.OnNavigationItemSelectedListener() {
                          @Override
                          public boolean onNavigationItemSelected(MenuItem menuItem) {
                              menuItem.setChecked(true);
                              Toast.makeText(getApplicationContext(), "Current selection : " + menuItem.getTitle(), Toast.LENGTH_SHORT).show();
                              mDrawerLayout.closeDrawers();
                              return true;
                          }
                      });
          }
Now we will add Navigation View and call the setup function :
NavigationView navigationView = (NavigationView) findViewById(R.id.nav_view);
        if (navigationView != null) {
            setupDrawerContent(navigationView);
        }
Now we will make the drawer open on clicking the hamburger button :
Add the following code in onOptionsItemSelected() function in MainActivity.java :
if (id == android.R.id.home) {
            mDrawerLayout.openDrawer(GravityCompat.START);
        }
Adding checks on EditText
Now we saw that when the EditText gets error message when we try to save an empty string, the error message doesnot dissappear when it gets filled. So we need to add a check on EditText to monitor it's current string value. Fot that we will use TextWatcher :
TextWatcher textWatcher = new TextWatcher() {
            @Override
            public void beforeTextChanged(CharSequence s, int start, int count, int after) {

            }

            @Override
            public void onTextChanged(CharSequence s, int start, int before, int count) {
                fab.show();
                if (surName.getText().toString().trim().length() > 0) {
                    secondNameLayout.setError("");
                }
                if (firstName.getText().toString().trim().length() > 0) {
                    firstNameLayout.setError("");
                }
            }

            @Override
            public void afterTextChanged(Editable s) {

            }
        };

        firstName.addTextChangedListener(textWatcher);
        surName.addTextChangedListener(textWatcher);
So it contstantly monitors the EditText and we add the listeners to the EditText.
Adding Tabs
Sometimes we need tabs to make our application more easy to use and we need the user to access subsets of a bigger set, that means the data sets are different but are similar in nature. For eg. Play Newsstand, the news feed is distributed in different types : the nature is same but they are different.
Add the TabLayout view in your AppBarLayout in the activity_main.xml :
<android.support.design.widget.TabLayout
                android:id="@+id/tabs"
                android:layout_below="@+id/toolbar"
                android:layout_width="match_parent"
                android:layout_height="wrap_content"
                android:background="?attr/colorPrimary"
                android:minHeight="?attr/actionBarSize"
                android:theme="@style/ThemeOverlay.AppCompat.Dark.ActionBar"
                app:tabIndicatorColor="@android:color/white"
                app:tabIndicatorHeight="4dp"/>
First we will add TabLayout :
private TabLayout tabLayout;
Now we will initialize and add tabs :
tabLayout = (TabLayout)findViewById(R.id.tabs);
tabLayout.addTab(tabLayout.newTab().setText("Contact"));
tabLayout.addTab(tabLayout.newTab().setText("Message"));
tabLayout.addTab(tabLayout.newTab().setText("Images"));
What we've covered
✓ Starting Android Application development.
✓ Using some common components used in an application and using Material Design .
Next Steps
- Save multiple contacts and display them in list.
- Make new Fragments and attach them to tabs you created.
- Show primary contact detail in Navigation Drawer header.